
The target Kubernetes(minikube) version is v1.32.0.
Step1.Install Minikube
1.Install Minikube
# Download Minikube package
$ curl -LO https://storage.googleapis.com/minikube/releases/latest/minikube-linux-amd64
$ ls -l
minikube-linux-amd64

# Install Minikube(Copy minikube-linux-amd64 to /usr/local/bin/minikube)
$ sudo install minikube-linux-amd64 /usr/local/bin/minikube

# Remove the original file(optional)
$ rm minikube-linux-amd64
2.Install kubectl
# Download kubectl package
$ curl -LO https://storage.googleapis.com/kubernetes-release/release/$(curl -s https://storage.googleapis.com/kubernetes-release/release/stable.txt)/bin/linux/amd64/kubectl
$ ls -l
kubectl

# Install kubectl(Move to /usr/local/bin/kubectl)
chmod +x ./kubectl
sudo mv ./kubectl /usr/local/bin/kubectl
3.Start Minikube (It will take a few minutes in the first time)
$ minikube start
😄  minikube v1.32.0 on Ubuntu 22.04 (amd64)
✨  Automatically selected the docker driver. Other choices: none, ssh
📌  Using Docker driver with root privileges
👍  Starting control plane node minikube in cluster minikube
🚜  Pulling base image ...
💾  Downloading Kubernetes v1.28.3 preload ...
    > preloaded-images-k8s-v18-v1...:  403.35 MiB / 403.35 MiB  100.00% 2.87 Mi
    > gcr.io/k8s-minikube/kicbase...:  453.90 MiB / 453.90 MiB  100.00% 3.08 Mi
🔥  Creating docker container (CPUs=2, Memory=2200MB) ...
🐳  Preparing Kubernetes v1.28.3 on Docker 24.0.7 ...
    ▪ Generating certificates and keys ...
    ▪ Booting up control plane ...
    ▪ Configuring RBAC rules ...
🔗  Configuring bridge CNI (Container Networking Interface) ...
🔎  Verifying Kubernetes components...
    ▪ Using image gcr.io/k8s-minikube/storage-provisioner:v5
🌟  Enabled addons: storage-provisioner, default-storageclass
🏄  Done! kubectl is now configured to use "minikube" cluster and "default" namespace by default
4.Verify installation
$ kubectl cluster-info
Kubernetes control plane is running at https://127.0.0.1:32769
CoreDNS is running at https://127.0.0.1:32769/api/v1/namespaces/kube-system/services/kube-dns:dns/proxy
5.Show pods in the kube-system namespace
$ kubectl get pods -n kube-system
NAME                               READY   STATUS    RESTARTS      AGE
coredns-5dd5756b68-ht4bf           1/1     Running   0             12h
etcd-minikube                      1/1     Running   0             12h
kube-apiserver-minikube            1/1     Running   0             12h
kube-controller-manager-minikube   1/1     Running   0             12h
kube-proxy-49nbn                   1/1     Running   0             12h
kube-scheduler-minikube            1/1     Running   0             12h
storage-provisioner                1/1     Running   1 (12h ago)   12h
Step2.Learn about Kubernetes architecture(Master, Nodes, Pods, etc.)
1. Kubernetes Architecture:
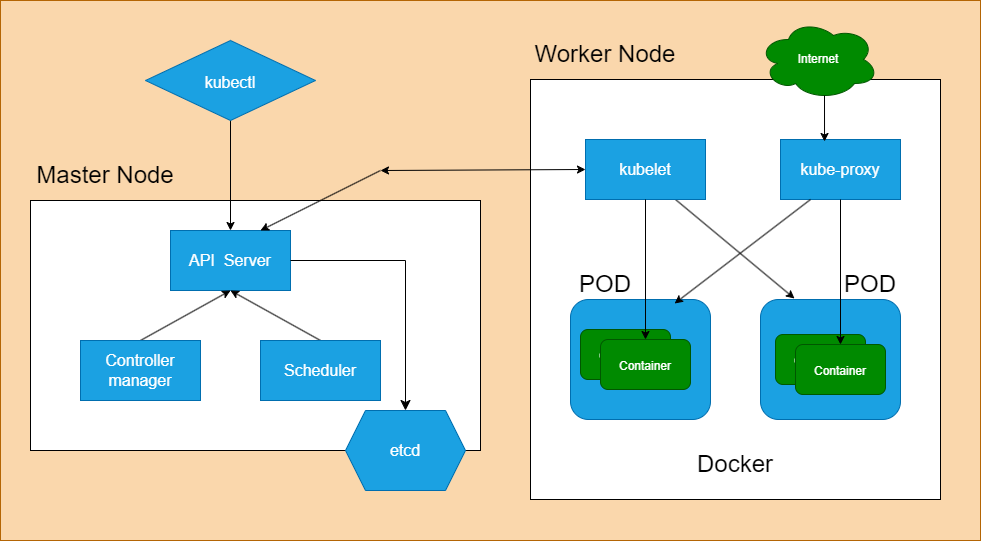
Kubernetes follows a master-worker architecture, where the master node manages the cluster and the worker nodes (also known as minions) execute the tasks assigned by the master. Here’s a high-level overview:
- Master Node:
- The master node is responsible for managing the Kubernetes cluster.
- It coordinates all activities in the cluster, including scheduling applications, maintaining desired state, scaling, and rolling out updates.
- Components of the master node include:
- API Server: Exposes the Kubernetes API, which allows clients to interact with the cluster.
- Scheduler: Assigns pods to nodes based on resource availability and scheduling policies.
- Controller Manager: Watches the state of the cluster through the API server and performs cluster management tasks (e.g., node management, replication control, endpoint management).
- etcd: A distributed key-value store that stores the cluster’s configuration data and the state of the cluster.
- Worker Node:
- Worker nodes are the machines (physical or virtual) where applications run.
- They communicate with the master node and execute the tasks assigned to them.
- Components of a worker node include:
- Kubelet: An agent that runs on each node and communicates with the Kubernetes master.
- Container Runtime: Software responsible for running containers (e.g., Docker, containerd).
- kube-proxy: Maintains network rules on the worker node. It enables communication between different pods and services within the cluster.
Step3.Familiarize Kubernetes terminology (Deployments, ReplicaSets, Pods, Services, etc.)
1. Pods:
- Definition: A Pod is the smallest deployable unit in Kubernetes, representing one or more containers that are tightly coupled and share resources like networking and storage.
- Usage: Pods are the basic building blocks of Kubernetes applications. They encapsulate the application’s containers, storage resources, and unique network IP.
2. Deployments:
- Definition: A Deployment is a Kubernetes resource that manages a replicated application, ensuring that a specified number of pod replicas are running at any given time.
- Usage: Deployments are commonly used for managing stateless applications. They provide declarative updates, rollbacks, and scaling capabilities for application replicas.
3. ReplicaSets:
- Definition: A ReplicaSet is a Kubernetes resource that ensures a specified number of identical pod replicas are running at any given time.
- Usage: ReplicaSets are often managed by Deployments. They help maintain the desired number of pods and handle scaling up or down based on defined criteria.
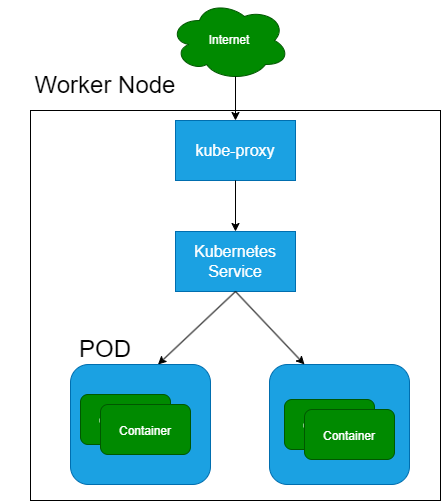
4. Services:
- Definition: A Service is a Kubernetes resource that provides a consistent way to access a set of pods. It defines a logical set of pods and a policy by which to access them.
- Usage: Services enable networking and load balancing within the Kubernetes cluster. They provide a stable endpoint (IP address and port) for accessing the application running inside pods, regardless of pod changes or failures.
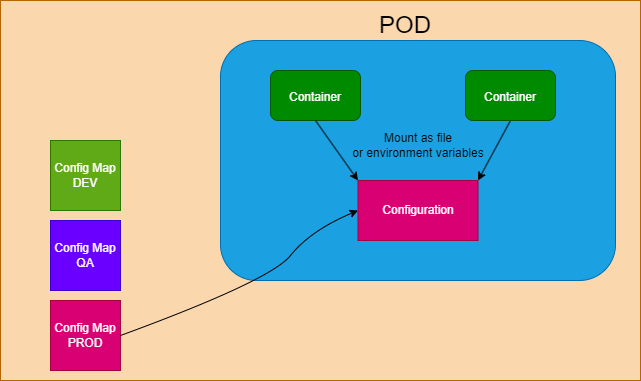
5. ConfigMaps:
- Definition: ConfigMaps are Kubernetes resources used to store configuration data in key-value pairs. They decouple configuration from the container images, allowing for easier management and updates.
- Usage: ConfigMaps can be mounted as files or environment variables inside pods, providing configuration settings to applications without requiring changes to the application code.
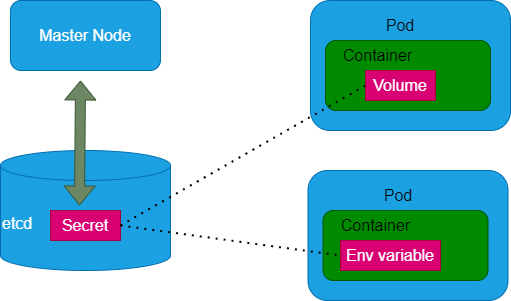
6. Secrets:
- Definition: Secrets are Kubernetes resources used to store sensitive information, such as passwords, tokens, or certificates, in an encrypted format.
- Usage: Secrets provide a secure way to store and distribute sensitive data to pods. They can be mounted as files or environment variables, ensuring secure access within the application.
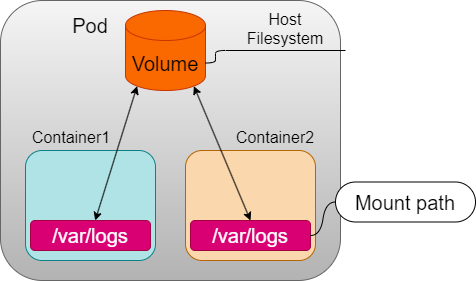
7. Volumes:
- Definition: Kubernetes Volumes are persistent storage units that exist beyond the lifecycle of individual Pods.
- Usage: They provide data persistence for containers and enable sharing data between containers in a Pod.
Step4.Deploy a simple application (e.g., a web server)
1. Create a Deployment Manifest (deployment.yaml)
apiVersion: apps/v1
kind: Deployment
metadata:
  name: web-server-deployment
spec:
  replicas: 3        # Number of pod replicas to run
  selector:
    matchLabels:
      app: web-server
  template:
    metadata:
      labels:
        app: web-server
    spec:
      containers:
        - name: web-server
          image: nginx:1.14.2   # Use the NGINX Docker image as an example
          ports:
- containerPort: 80 # Port on which the container listens- The desired number of replicas (3 in this case).
- Labels to select the pods managed by this deployment.
- Configuration for the pod template, including the container specification (using the NGINX Docker image and exposing port 80).
2. Create a Service Manifest (service.yaml)
apiVersion: v1
kind: Service
metadata:
  name: web-server-service
spec:
  selector:
    app: web-server
  ports:
    - protocol: TCP
      port: 80          # Port on which the service listens
      targetPort: 80    # Port to forward traffic to in the pods
      name: wsp         # Just for reference. Any name is OK.
type: ClusterIP- Labels to select the pods to expose.
- Configuration for the service ports, including the port to listen on and the target port in the pods.
- The service type as ClusterIP, which exposes the service internally within the cluster.
3. Apply the Manifests
$ kubectl apply -f deployment.yaml
deployment.apps/web-server-deployment created

$ kubectl apply -f service.yaml
service/web-server-service created
4. Verify Deployment and Service
$ kubectl get deployments
NAME                    READY   UP-TO-DATE   AVAILABLE   AGE
web-server-deployment   3/3     3            3           91s

$ kubectl get pods
NAME                                     READY   STATUS    RESTARTS   AGE
web-server-deployment-6446bb766c-4skzc   1/1     Running   0          106s
web-server-deployment-6446bb766c-9f8fr   1/1     Running   0          106s
web-server-deployment-6446bb766c-h4zjg   1/1     Running   0          106s

$ kubectl get services
NAME                 TYPE        CLUSTER-IP      EXTERNAL-IP   PORT(S)   AGE
kubernetes           ClusterIP   10.xx.x.x       <none>        443/TCP   6d1h
web-server-service   ClusterIP   10.yyy.yyy.yy   <none>        8080/TCP    109s

$ kubectl describe service web-server-service
Name:              web-server-service
Namespace:         default
Labels:            <none>
Annotations:       <none>
Selector:          app=web-server
Type:              ClusterIP
IP Family Policy:  SingleStack
IP Families:       IPv4
IP:                10.yyy.yyy.yy
IPs:               10.yyy.yyy.yy
Port:              wsp  80/TCP
TargetPort:        8080/TCP
Endpoints:         10.zzz.z.33:8080,10.zzz.z.34:8080,10.zzz.z.35:8080
Session Affinity:  None
Events:            <none>
5. Access the Web Server
# Expose the port number
$ kubectl expose deploy/web-server-deployment --port=80
# Port forwarding
$ kubectl port-forward svc/web-server-deployment 8080:80
Forwarding from 127.0.0.1:8080 -> 80
Forwarding from [::1]:8080 -> 80
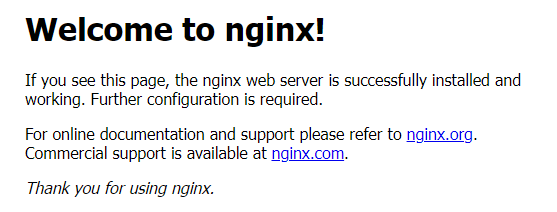
# This will keep running on the console, "ctrl + c" to exitOpen a web browser and navigate to the “http://localhost:8080/” to see the default NGINX welcome page.
Step5.Use kubectl commands to interact with your Kubernetes cluster.
1.List Pods
This command will list all the pods running in your cluster.
$ kubectl get pods2.Describe a Pod
Replace <pod_name> with the name of a specific pod from the previous command output. This command provides detailed information about the specified pod, including its status, IP address, labels, and events.
$ kubectl describe pod <pod_name>3.List Services
This command will list all the services in your cluster.
$ kubectl get services4.Descrive a Service
Replace <service_name> with the name of a specific service from the previous command output. This command provides detailed information about the specified service, including its endpoints, ports, and selectors.
$ kubectl describe service <service_name>5.List Deployments
This command will list all the deployments in your cluster.
$ kubectl get deployments6.Describe a Deployment
Replace <deployment_name> with the name of a specific deployment from the previous command output. This command provides detailed information about the specified deployment, including its replicas, strategy, and events.
$ kubectl describe deployment <deployment_name>7.View logs of a Pod
Replace <pod_name> with the name of a specific pod. This command will display the logs of the specified pod.
$ kubectl logs <pod_name>8.Execute a Command in a Pod
Replace <pod_name> with the name of a specific pod, and <command> with the command you want to execute. This command allows you to run arbitrary commands inside the specified pod.
$ kubectl exec -it <pod_name> -- <command>9.Delete Resources
Replace <resource_type> with the type of Kubernetes resource you want to delete (e.g., pod, service, deployment) and <resource_name> with the name of the resource you want to delete. This command allows you to delete resources from your cluster.
$ kubectl delete <resource_type> <resource_name>Step6.Learn common troubleshooting techniques in Kubernetes (e.g., checking pod status, logs, describing resources).
1. Checking Pod Status
This command lists all pods in the default namespace along with their status.
$ kubectl get pods2. Describing a Pod
- Replace
<pod_name>with the name of the pod you want to inspect. - This command provides detailed information about the specified pod, including its status, IP address, labels, and events.
$ kubectl describe pod <pod_name>3. Viewing Pod Logs
- Replace
<pod_name>with the name of the pod you want to view logs for. - This command displays the logs produced by the specified pod.
$ kubectl logs <pod_name>4. Following Pod Logs
Similar to the previous command but continuously streams logs as they’re generated.
$ kubectl logs -f <pod_name>5. Executing Commands in a Pod
- Replace
<pod_name>with the name of the pod you want to execute a command in, and<command>with the command you want to run. - This command allows you to run arbitrary commands inside the specified pod.
$ kubectl exec -it <pod_name> -- <command>6. Describing Resources
- Replace
<resource_type>with the type of Kubernetes resource you want to describe (e.g., pod, service, deployment), and<resource_name>with the name of the resource. - This command provides detailed information about the specified resource, including its configuration and status.
$ kubectl describe <resource_type> <resource_name>7. Checking Service Status
This command lists all services in the default namespace along with their status.
$ kubectl get services8. Checking Deployment Status
This command lists all deployments in the default namespace along with their status.
$ kubectl get deployments9. Troubleshooting with Events
This command lists recent events in the cluster, which can provide insights into ongoing issues.
$ kubectl get events10. Describe Node
- Replace
<node_name>with the name of the node you want to describe. - This command provides detailed information about the specified node, including its capacity, conditions, and allocated resources.
$ kubectl describe node <node_name>Step7.Understand the role of Deployments and ReplicaSets in managing containerized applications.
Deployments:
Deployments are Kubernetes resources used to manage the lifecycle of pods and ensure that a specified number of pod replicas are running at all times. Deployments are commonly used to define and manage stateless applications. Here’s a breakdown of their key features and functionalities:
- Pod Template Specification:
- Deployments define a pod template specification, which includes details such as the container image, environment variables, volumes, and ports for the pods.
- The pod template serves as a blueprint for creating and managing pod replicas.
- Replica Management:
- Deployments ensure that a desired number of pod replicas, specified by the
replicasfield, are running at all times. - If a pod fails or becomes unavailable, the Deployment automatically replaces it with a new pod to maintain the desired replica count.
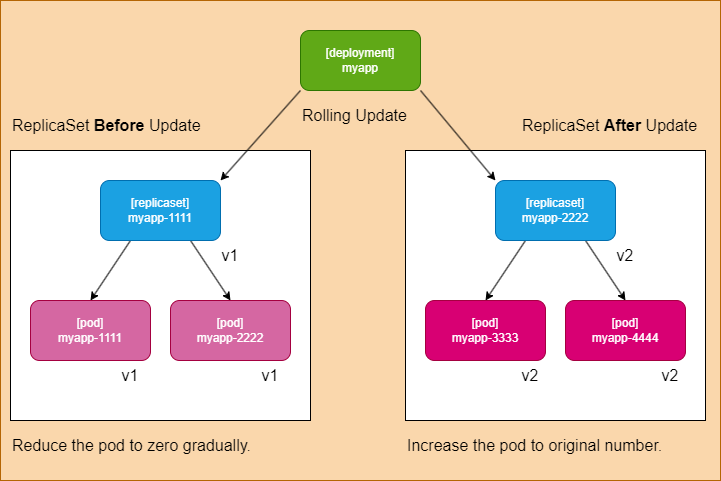
- Deployments facilitate rolling updates and rollbacks by gradually updating pods with new configurations or reverting to previous versions.
- Deployments ensure that a desired number of pod replicas, specified by the
- Scaling:
- Deployments support horizontal scaling by allowing you to scale the number of pod replicas up or down dynamically based on resource demands.
- You can adjust the
replicasfield in the Deployment manifest or usekubectl scalecommand to scale deployments.
- Rolling Updates and Rollbacks:
- Deployments enable seamless rolling updates, allowing you to update the container image or configuration of pods without downtime.
- If an update causes issues, Deployments support automatic rollbacks to the previous stable version.
# Definition of Deployment
apiVersion: apps/v1
kind: Deployment
metadata:
  # Must be unique in the Namespace
  name: deployment-sample
spec:
  # Number of replica (Replica Management, Scaling)
  replicas: 2
  # Pod Template (Pod Template Specification)
  template:
    metadata:
      labels:
        # Mandatory the label definition
        app: deployment-sample
    spec:
      containers:
      - name: nginx
        image: nginx:1.10
        ports:
        - containerPort: 80
ReplicaSets:
ReplicaSets are lower-level Kubernetes resources that ensure a specified number of pod replicas are running and maintained according to a defined template. They are typically created and managed by Deployments but can also be used independently. Here’s an overview of their role and functionality:
- Pod Replication:
- ReplicaSets are responsible for maintaining a specified number of identical pod replicas defined by the
replicasfield in the ReplicaSet manifest. - They monitor the status of pods and create or delete pod replicas as needed to match the desired state.
- ReplicaSets are responsible for maintaining a specified number of identical pod replicas defined by the
- Pod Template:
- Similar to Deployments, ReplicaSets define a pod template specification that includes container images, configuration, and metadata for the pods it manages.
- The pod template serves as a blueprint for creating and managing pod replicas within the ReplicaSet.
- Scalability:
- ReplicaSets support horizontal scaling by allowing you to adjust the number of pod replicas dynamically.
- You can update the
replicasfield in the ReplicaSet manifest or usekubectl scalecommand to scale the number of replicas.
- Replacement and Healing:
- If a pod replica fails or becomes unavailable, the ReplicaSet automatically creates a new pod to replace it, ensuring that the desired replica count is maintained.
- ReplicaSets contribute to the high availability and fault tolerance of applications by automatically healing and replacing failed pods.
# Definition of ReplicaSet
apiVersion: apps/v1
kind: ReplicaSet
metadata:
  name: sample-replicaset
spec:
  # Number of replica (Pod Replication, Scalability)
  replicas: 4
  selector:
    matchLabels:
      app: sample-replicaset
  # Pod Template
  template:
    metadata:
      labels:
        app: sample-replicaset
    spec:
      containers:
      - name: nginx-container
        image: nginx:latest
Relationship between Deployments and ReplicaSets:
- Deployments use ReplicaSets internally to manage pod replicas. When you create a Deployment, Kubernetes creates a corresponding ReplicaSet based on the pod template specified in the Deployment manifest.
- Deployments provide higher-level functionality such as rolling updates, rollbacks, and declarative management of application deployments.
- ReplicaSets focus on ensuring the desired number of pod replicas are maintained and handling pod lifecycle events like scaling, replacement, and healing.
In summary, Deployments and ReplicaSets work together to manage containerized applications in Kubernetes. Deployments provide orchestration and lifecycle management capabilities, while ReplicaSets handle pod replication and maintenance to ensure application availability and scalability.
If we define “Deployment manifest”, we don’t need to define “ReplicaSet manifest” individually.
Step8.Experiment with scaling deployments and updating application versions.
Scaling Deployments:
1. View Current Deployments:
First, let’s check the current Deployments in your cluster:
kubectl get deployments2. Scale Deployment:
To scale a Deployment named web-server-service to a specific number of replicas (e.g., 5 replicas), use the following command:
kubectl scale deployment web-server-service --replicas=5Replace my-deployment with the name of your Deployment.
3. Verify Scaling:
Check the status of your Deployment to ensure it has scaled to the desired number of replicas:
kubectl get deployments kubectl get podsUpdating Application Versions:
1. Update Deployment Image:
To update the container image of your Deployment, edit the Deployment manifest file (deployment.yaml) to specify the new image version. For example:
apiVersion: apps/v2
kind: Deployment
metadata:
  name: web-server-deployment
spec:
  replicas: 5        # Update 3 to 5
  selector:
    matchLabels:
      app: web-server
  template:
    metadata:
      labels:
        app: web-server
    spec:
      containers:
        - name: web-server
          image: nginx:1.14.2
          ports:
            - containerPort: 80
Save the changes to the file.
2. Apply Updated Manifest:
Apply the updated Deployment manifest to apply the changes and trigger the rolling update:
kubectl apply -f deployment.yaml3. Verify Update:
Check the status of your Deployment to ensure the update is in progress and pods are being rolled out with the new image version:
kubectl get deployments kubectl get pods --watchThe --watch flag will continuously watch for changes in pod status.
4. Check Rollout Status:
Monitor the rollout status to see the progress of the update:
kubectl rollout status deployment/web-server-service5. Rollback Update (Optional):
If the update encounters issues or you need to rollback to the previous version, use the following command:
kubectl rollout undo deployment/web-server-serviceThis will rollback to the previous stable version of the Deployment.
Step9.Explore Kubernetes networking concepts.
1. Pod Networking:
1.1. List Pods:
kubectl get podsThis command lists all the pods in the default namespace.
1.2. Describe Pod Networking:
kubectl describe pod <pod_name>Replace <pod_name> with the name of a specific pod. This command provides detailed information about the pod, including its networking settings, IP address, and network interfaces.
1.3. Connect to a Pod:
kubectl exec -it <pod_name> -- /bin/shReplace <pod_name> with the name of a specific pod. This command allows you to connect to a pod and execute commands inside its container.
2. Service Networking:
2.1. List Services:
kubectl get servicesThis command lists all the services in the default namespace.
2.2. Describe Service Networking:
kubectl describe service <service_name>Replace <service_name> with the name of a specific service. This command provides detailed information about the service, including its endpoints, cluster IP, ports, and selectors.
2.3. Access Service from Inside Cluster:
You can access a service from inside the cluster using its cluster IP and port. For example:
curl http://<service_name>:<port>Replace <service_name> with the name of the service and <port> with the service port.
3. Node Networking:
3.1. List Nodes:
kubectl get nodesThis command lists all the nodes in the cluster.
3.2. Describe Node Networking:
kubectl describe node <node_name>Replace <node_name> with the name of a specific node. This command provides detailed information about the node, including its IP address, allocated resources, and network configuration.
4. Ingress Networking:
4.1. List Ingress Resources:
kubectl get ingressesThis command lists all the Ingress resources in the default namespace.
4.2. Describe Ingress Networking:
kubectl describe ingress <ingress_name>Replace <ingress_name> with the name of a specific Ingress resource. This command provides detailed information about the Ingress resource, including its rules, backend services, and TLS settings.
5. Network Policies:
5.1. List Network Policies:
kubectl get networkpoliciesThis command lists all the Network Policies in the default namespace.
5.2. Describe Network Policy:
kubectl describe networkpolicy <network_policy_name>Replace <network_policy_name> with the name of a specific Network Policy. This command provides detailed information about the Network Policy, including its rules for controlling pod-to-pod communication.
6. Troubleshooting Networking:
6.1. Network Diagnostics:
kubectl exec <pod_name> -- ping <ip_address>Replace <pod_name> with the name of a specific pod and <ip_address> with the IP address you want to ping. This command allows you to diagnose network connectivity between pods.
6.2. DNS Resolution:
kubectl exec <pod_name> -- nslookup <service_name>Replace <pod_name> with the name of a specific pod and <service_name> with the DNS name of a service. This command checks DNS resolution for a service from inside a pod.
Step10.Create different types of Services (ClusterIP, NodePort, LoadBalancer)
Step11.Learn about PersistentVolumes (PVs) and PersistentVolumeClaims (PVCs) in Kubernetes
Step12.Practice creating and using PersistentVolumes for stateful applications
Step13.Learn about Helm, a package manager for Kubernetes
Step14.Create and use Helm charts to package and deploy applications
Step15.Practice upgrading application versions and rolling back changes using Kubernetes Deployment strategies
Step16.Explore Horizontal Pod Autoscaling (HPA) and Vertical Pod Autoscaling (VPA)
Step17.Experiment with setting up autoscaling for your deployments
Step18.Learn about Kubernetes Operators and how they automate operational tasks
Step19.Experiment with existing Operators or create your own
Step20.Explore Kubernetes monitoring solutions like Prometheus and Grafana
Step21.Set up monitoring for your cluster and applications
Step22.Learn about Kubernetes security best practices
Step23.Practice configuring Role-Based Access Control (RBAC) for your cluster
Step24.Understand StatefulSets and their use cases for stateful applications
Step25.Deploy a stateful application using StatefulSets
Step26.Learn about Custom Resource Definitions and Custom Resources
Step27.Experiment with creating and using custom resources